I glued all of the kerfing on the top of the rim today. I also wet and clipped the back kerfing to the outside of the rim per KMG's instructions to preshape it hopefully to be glued tomorrow during my son's nap. Good times.
No pics...it looks just like the pics from earlier, but with more kerf. I'll post pics when all of the kerfing is in.
Wednesday, September 30, 2009
A little info, a little work.
I wanted to share some info before I got to work today. I never would have attempted this build without the encouragement of Bill Cory and the great members of Kitguitarforum.com. Bill, like myself, had little to no experience working with wood but one day got the idea he could build a guitar. He discovered that the CF Martin company sold kits that allowed anyone to build one of their guitars. Unfortunately, the instruction manual Martin provides with their kit is only 16 pages and leaves many, many, MANY steps upmto your imagination. So Bill went and wrote his own. Bill went on to start the KitGuitarForum, and KitGuitarBuilder websites. Both of which are great sites and great resources for anyone thinking of building an acoustic guitar in general, not just a kit. Bill has inspired many people to attempt their first build and is responsible for me building this guitar. Thanks Bill!! Go support Bill's sites, would you? I need them to stay around!!
I can't forget Ken Cierp at KMG. He has been great to deal with. He gets more kudos later on when I get to installing the free stuff he sent me.
Now back to my regularly, or not so regularly scheduled, guitar building. I am gluing the kerfing today. First I have to cut it to size, then glue it in. This procedure requires very specialized clamps. You may have never seen anything like these clamps. This clamp design was invented by Zoe M. Martella of Springfield, Vermont in 1853 (This is really true and she also invented the spatula. I read it on Wikipedia, so it has to be true) and it still used today by the Martin guitar company for this process. Here is a picture so I do not have to describe them:
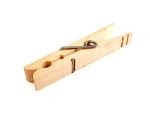
Highly specialized Kerfing clamp.
Yes...the lowly clothespin has been elevated to the status of a highly specialized luthier's tool. Did you know "Luthier" is not in my spell check either? Well it wasn't. But it is now. Along with Kerf and its various forms.
Here is a picture of the first strip of kerfing glued in with many "spring loaded, wooden luthier's clamps" holding it in place while the glue dries:
Now all I have to do is repeat this for the back and I am ready to start bracing the top and back. This is progressing faster than I thought it would. I am sure it is going to slow down soon. Bracing the top and back seem a bit more time consuming.
Here is a parting shot of the kerfing after I removed the clothespins...errr...Spring Loaded Wooden Luthier's Clamps.
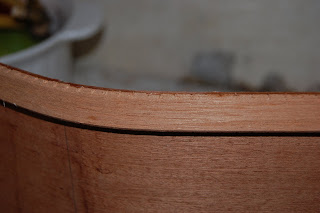
EXTREME CLOSEUP!!!
Here is a picture of the first strip of kerfing glued in with many "spring loaded, wooden luthier's clamps" holding it in place while the glue dries:

Now all I have to do is repeat this for the back and I am ready to start bracing the top and back. This is progressing faster than I thought it would. I am sure it is going to slow down soon. Bracing the top and back seem a bit more time consuming.
Here is a parting shot of the kerfing after I removed the clothespins...errr...Spring Loaded Wooden Luthier's Clamps.

EXTREME CLOSEUP!!!
Click on any picture for a larger view. Except for the picture of the guitar I hope I don't end up with. That one does not get bigger. But that was like a week ago, and you don't want to go back in time, do you? No...it will only cause problems if you do. You might end up erasing your own existence...like Marty McFly in the original Back to the Future!! And erasing one's own existence really sucks.
FYI: I glued all of the kerfing for the top of the guitar today while my son was napping. I only had 48 clamps and I think it was recommended that I have 50 by my kit designer. But since they were sold in packs of 24 clamps, I opted to NOT splurge on one more pack. It would have also left me with 22 extra clothespins that I had no use for. And who needs 22 clothespins cluttering up their house? Certainly not me.
FYI: I glued all of the kerfing for the top of the guitar today while my son was napping. I only had 48 clamps and I think it was recommended that I have 50 by my kit designer. But since they were sold in packs of 24 clamps, I opted to NOT splurge on one more pack. It would have also left me with 22 extra clothespins that I had no use for. And who needs 22 clothespins cluttering up their house? Certainly not me.
Tuesday, September 29, 2009
Prepping for the kerf
I am not doing much on the guitar today. A few mods to the mold per my kit makers instructions to get ready for installing the kerfed lining and other future steps. Here is an interesting tidbit of info for you, when you mke a cut in wood with a saw, the slit you make is called a kerf. Kerfing it a strip of wood with a kerf, or slit, every quarter of an inch or so. It is cut like this so you can conform it to the sides of the guitar. Anyone who has ever broken a stick can tell you that wood does not bend very well under normal circumstances. The cuts help to increase what I call the bend-nicity, or bend-itosity of the wood strip. The kerfing strip is what the top and back of the guitar are really attached too, not just the thin side of the guitar. Another interesting tidbit of info is that the words kerf, kerfed, and kerfing are not in my spell check, so as I write this post, there are little red dots under each of those words proclaiming that my computer thinks I am a bad speller. Well screw you spell check! I know these words are real and I have spelled them correctly.
I am also getting the kerfed lining ready to be installed. KMG kits use reverse rounded kerfing. This type of kerfing has the cut, or kerfed side, facing the side of the guitar...away from the inside. Traditional kerfing has the cuts facing so you can see them if you look inside the guitar. For more information, please go to this link at KMG's site. It explains it much better than I do. Here is the link: http://www.kennethmichaelguitars.com/REVERSEKERFING.html
 Kerf-tastic!
I am also getting the kerfed lining ready to be installed. KMG kits use reverse rounded kerfing. This type of kerfing has the cut, or kerfed side, facing the side of the guitar...away from the inside. Traditional kerfing has the cuts facing so you can see them if you look inside the guitar. For more information, please go to this link at KMG's site. It explains it much better than I do. Here is the link: http://www.kennethmichaelguitars.com/REVERSEKERFING.html
Here is a picture of my kerfing clipped to the outside of the rim, just like
Ken Cierp describes on his site.
Ken Cierp describes on his site.
 Kerf-tastic!
Here is a close up from top to bottom, of the front and back of the kerfed lining respectively.
The quarter is for scale purposes and because kerfing likes loose change: KERFY!!
Here is the kerfing in the shape of the letter T because my name is Tony. The quarter is there because the kerf wouldnt give it back to me. KERFY T!!
The quarter is for scale purposes and because kerfing likes loose change:
 KERFY!!
Here is the kerfing in the shape of the letter T because my name is Tony. The quarter is there because the kerf wouldnt give it back to me.
 KERFY T!!
Thats all I have was able to do tonight. Now the kerfing has to dry because I had to wet it in order for it to bend more easily into the tight, sexy, jean-filling curves of the guitar. Hopefully everything will have dried out by tomorrow and I can get to gluing when I get home. Then I get to repeat this all over again for the kerfing on the other side of the rim. REDUNDANT KERFING!! YEEHAW!!
Monday, September 28, 2009
Gluing the neck block....really...I swear.
I did it!! I glued the neck block. At 11:30 PM I said, much like Tom Cruise's character in Risky business, "Sometimes you gotta just say 'What the cluck!'" He actually used a naughty word, but I think I have to classify this blog as adult content if I do that.
Anyway, I needed to do it. I wanted to do it. Not doing it was holding me back from doing anything else. And my wife wanted me to move the mess out of my "workshop" so she could clean today. My "workshop" alternates between my coffee table in the living room, and the floor in the corner of my computer area. Neither are ideal for work that requires any type of precision, but I read about this guy who built the same type of guitar I am building in his kitchen in a one bedroom condo in Seattle. His workshop was also not ideal and his guitar turned out pretty nice, so I figured I would up the ante and really make things difficult for myself by not even using a table. He used his dining room table. Pansy.
Back to the action. Let me set the stage for you: I explained to my wife how important this step was. Her reply was a sane and well thought out one. She said I should wait until tomorrow when I had more time to make sure I do it right and I could remeasure everything to ensure I do not screw up this most vital of steps. To which I replied, "Listen here woman, I am doing this NOW!! Get my glue!! Hand me those clamps!!" To which she replied, "Hahahahahahahahahahahahahahahahahahahahahahahahahah. (She stopped to inhale here) Hahahahahahahahahahahahahahahahahahahahahahah. Whatever. Don't say I didnt warn you if you mess it up." She threw in one more chuckle as she recalled how I tried to be bossy and manly, then she went back to her work. I grabbed my clamps and glue and went to work. I checked everything one more time, dry fitted everything with the clamps to make sure my clamping procedure would work and it was finally the moment of truth.
I smeared glue on the head block and its spot on the body and following the instructions from the man who made my kit, I rammed that bad boy in place. I clamped it all up, and cleaned up the glue squeeze out. Here is what is looked like with the clamps in place right before I went to bed:
Close up!!

Close up!!

Ken Cierp, of KennethMichaelGuitars.com has many mentions of "good craftmanship" in his instructions. I could build a beautiful guitar on the outside, but when you look inside of it, there could be glue everywhere and marks from the chisles and sandpaper, and that would detract from the whole thing. So I did what he advised and cleaned up the glue while it was still wet so it wont look like crap on the inside. One day, I want to be proud of this thing! Here is a picture after I removed the clamps:
And now.....drum roll please..........OUT OF THE MOLD!!! Ta-Daaa!!
 For comparison purposes, here is the rim I just made in front of an actual guitar.
  Notice how my guitar rim looks sort of empty? That's because it has no soul yet. That step comes later.
Not bad huh? Its starting to look like something guitar-ish. I hope things continue this well.
Sunday, September 27, 2009
Gluing the neck block...sort of.
OK...last night I ended up staying up a bit later than I wanted to, but I was measuring, remeasuring, and then measuring AGAIN to make sure the location of the neck block was perfect. This is a step that scares me more than cutting the sides did.
I think some info is warranted here for anyone not familiar with building a guitar. The neck block, or head block, is what the neck of the guitar is eventually attached to. If the alignment of said neck block is not correct, you can kiss any chance of having a good sounding guitar goodbye. You will end up trying to correct all kinds of issues that you could have avoided if you had a good plan of attack to begin with.
I do not have a good plan of attack. I actually did not have any plan of attack at all. Fortunately, I do not need to come up with one of my own. The company I purchased my kit from, www.KennethMichaelGuitars.com had come up with an excellent plan of attack for me. Honestly, I'm really glad he did because, like I said before, I have never built anything before and I could seriously screw up this step.
I measured for the 47th time and then came the moment of truth. Here is a picture of what I did: If you are a guitarist you will notice that I am not gluing the neck block in this picture. In fact, the neck block is not even in the picture. You may be asking yourself, why am I looking at a picture of you NOT gluing the neck block? It looks like you are gluing the tail block!!
Well...I will tell you. At the last minute, I was too much of a chicken to glue the neck block. So I glued the tail block instead. Its location is not nearly as critical to the end result and caused me much less agida. Agida, if you are not Eye-talian is defined by the UrbanDictionary.com as Italian-American slang for heartburn but it can also mean mental aggravation. My mom agrees with this definition, so I know its right.
Anyway, I am holding off on the heart wrenching procedure of gluing the neck block until later. Possibly tonight. Possibly not. Here is a picture of my cat watching me write this crap:
 She looks annoyed because she was waiting for me to glue the neck block too. I am such a cat...if you know what I mean.
I think some info is warranted here for anyone not familiar with building a guitar. The neck block, or head block, is what the neck of the guitar is eventually attached to. If the alignment of said neck block is not correct, you can kiss any chance of having a good sounding guitar goodbye. You will end up trying to correct all kinds of issues that you could have avoided if you had a good plan of attack to begin with.
I do not have a good plan of attack. I actually did not have any plan of attack at all. Fortunately, I do not need to come up with one of my own. The company I purchased my kit from, www.KennethMichaelGuitars.com had come up with an excellent plan of attack for me. Honestly, I'm really glad he did because, like I said before, I have never built anything before and I could seriously screw up this step.
I measured for the 47th time and then came the moment of truth. Here is a picture of what I did:
 If you are a guitarist you will notice that I am not gluing the neck block in this picture. In fact, the neck block is not even in the picture. You may be asking yourself, why am I looking at a picture of you NOT gluing the neck block? It looks like you are gluing the tail block!!
Well...I will tell you. At the last minute, I was too much of a chicken to glue the neck block. So I glued the tail block instead. Its location is not nearly as critical to the end result and caused me much less agida. Agida, if you are not Eye-talian is defined by the UrbanDictionary.com as Italian-American slang for heartburn but it can also mean mental aggravation. My mom agrees with this definition, so I know its right.
Anyway, I am holding off on the heart wrenching procedure of gluing the neck block until later. Possibly tonight. Possibly not. Here is a picture of my cat watching me write this crap:
 She looks annoyed because she was waiting for me to glue the neck block too. I am such a cat...if you know what I mean.
The rim is in the mold!
Up until yesterday, I had not done much except to assemble the mold that came with my kit from KMG. That took some time since I do not have hours and hours a day to devote to this project. But the patience paid off and I ended up with a perfect mold that can be used over and over again should I decide to build more guitars (which would cause my wife to have a stroke I imagine!)
Here is a picture of the mold process:

Yesterday was a big day however, as I actually took a saw to the wood for the first time.
I cut and fit the sides of the guitar into the mold. This requires a level of precision that might take a pro 15 minutes, but took me
nearly two hours.
Here is a pic of the sides in the mold:
 WOW!! Marvel at my awesomeness!! Go on, marvel. I have nothing else to say. I am off to bed. You however, can sit and marvel all you wish. I wont stop you.
Here is a picture of the mold process:
Here...he is helping me assemble the parts. Notice how he has a triangle in his hand? That's to check, and recheck that the whole assembly is square.

Yesterday was a big day however, as I actually took a saw to the wood for the first time.
I cut and fit the sides of the guitar into the mold. This requires a level of precision that might take a pro 15 minutes, but took me
nearly two hours.
Here is a pic of the sides in the mold:
 WOW!! Marvel at my awesomeness!! Go on, marvel. I have nothing else to say. I am off to bed. You however, can sit and marvel all you wish. I wont stop you.
Tuesday, September 1, 2009
I made a blog
Hey! I made a blog! The purpose of this blog is to document my progress as I build an acoustic guitar. I have absolutely NO woodworking skills. I have never taken a shop class. I have never made anything out of wood...except a pile. But that was firewood logs and probably doesn't count as "building something out of wood." Other than cutting plywood and 2x4's I have, as previously stated, zero experience with wood working.
So why am I building a guitar? Because I think I can for some reason. Plus, I found a guy named Ken Cierpilowski who has a company called Kenneth Michael Guitars (http://www.kennethmichaelguitars.com/) where he sells what he calls his "KMG Success Kit" and he says that if you follow his instructions, you can build a quality acoustic guitar. Will it rival something made by Martin or Taylor? I don't know. I would guess not because in addition to having zero wood working skills, I do not know much about the construction of an acoustic steel string guitar and honestly, I do not even play very well! But I enjoy playing and can certainly appreciate the sound of a well made guitar.
Others have done it successfully so I think I can too. We shall see! My kit arrives soon although I have much to do in my house before I can start building so hopefully by the end of September, I will be building.
Here is a picture of what I would like to end up building:

Here is a picture of what I hope I do not end up building:
 Wish me luck!!
Subscribe to:
Posts (Atom)

