I can't forget Ken Cierp at KMG. He has been great to deal with. He gets more kudos later on when I get to installing the free stuff he sent me.
Now back to my regularly, or not so regularly scheduled, guitar building. I am gluing the kerfing today. First I have to cut it to size, then glue it in. This procedure requires very specialized clamps. You may have never seen anything like these clamps. This clamp design was invented by Zoe M. Martella of Springfield, Vermont in 1853 (This is really true and she also invented the spatula. I read it on Wikipedia, so it has to be true) and it still used today by the Martin guitar company for this process. Here is a picture so I do not have to describe them:

Highly specialized Kerfing clamp.
Yes...the lowly clothespin has been elevated to the status of a highly specialized luthier's tool. Did you know "Luthier" is not in my spell check either? Well it wasn't. But it is now. Along with Kerf and its various forms.
Here is a picture of the first strip of kerfing glued in with many "spring loaded, wooden luthier's clamps" holding it in place while the glue dries:
Now all I have to do is repeat this for the back and I am ready to start bracing the top and back. This is progressing faster than I thought it would. I am sure it is going to slow down soon. Bracing the top and back seem a bit more time consuming.
Here is a parting shot of the kerfing after I removed the clothespins...errr...Spring Loaded Wooden Luthier's Clamps.
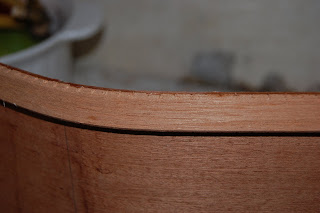
EXTREME CLOSEUP!!!
Here is a picture of the first strip of kerfing glued in with many "spring loaded, wooden luthier's clamps" holding it in place while the glue dries:

Now all I have to do is repeat this for the back and I am ready to start bracing the top and back. This is progressing faster than I thought it would. I am sure it is going to slow down soon. Bracing the top and back seem a bit more time consuming.
Here is a parting shot of the kerfing after I removed the clothespins...errr...Spring Loaded Wooden Luthier's Clamps.

EXTREME CLOSEUP!!!
Click on any picture for a larger view. Except for the picture of the guitar I hope I don't end up with. That one does not get bigger. But that was like a week ago, and you don't want to go back in time, do you? No...it will only cause problems if you do. You might end up erasing your own existence...like Marty McFly in the original Back to the Future!! And erasing one's own existence really sucks.
FYI: I glued all of the kerfing for the top of the guitar today while my son was napping. I only had 48 clamps and I think it was recommended that I have 50 by my kit designer. But since they were sold in packs of 24 clamps, I opted to NOT splurge on one more pack. It would have also left me with 22 extra clothespins that I had no use for. And who needs 22 clothespins cluttering up their house? Certainly not me.
FYI: I glued all of the kerfing for the top of the guitar today while my son was napping. I only had 48 clamps and I think it was recommended that I have 50 by my kit designer. But since they were sold in packs of 24 clamps, I opted to NOT splurge on one more pack. It would have also left me with 22 extra clothespins that I had no use for. And who needs 22 clothespins cluttering up their house? Certainly not me.


Hello i m Rahoul from India a small time supplier of rosewood guitar back and sides
ReplyDeleterosewood and ebony :fretboard,headplate,finished classical and acoustic guitar bridges. bridge pins,
end pins,nut and saddle of bone and horn.
if ur interested please reply me i will send u the pics and pricelist.
can do a good business.
email id is aqualibguitars@yahoo.com
waiting for ur reply..